STEP THREE: EDIT YOUR PHOTO
Part Four: Editing colored artwork in Picnik
Picnik is a free online photo-editing tool. It is available at Picnik.com and does not require downloads or registration. If you have a flickr stream, you can also access Picnik using the small "edit photo" icon above each of your photos. (Since I accessed Picnik through my flickr account, the interface will have some cosmetic differences if you access it through the main Picnik site. However, you will be able to do the same things.)
TIP! If you would like to practice by copying this step-by-step exactly, you can download my example picture here. Once you've downloaded it to your computer, you can then upload it to Picnik.
Since we avoided using flash when we took a picture of the colored artwork, our picture isn't as bright as it could be. We're going to do our best to lighten the background without ruining the colors.
Start by clicking the "Exposure" button.
Although we only used the default "Exposure" and "Contrast" options when editing our black-and-white lineart earlier, colored pictures can require a little more finesse. Click on the "Advanced" button and look at the box that pops up.
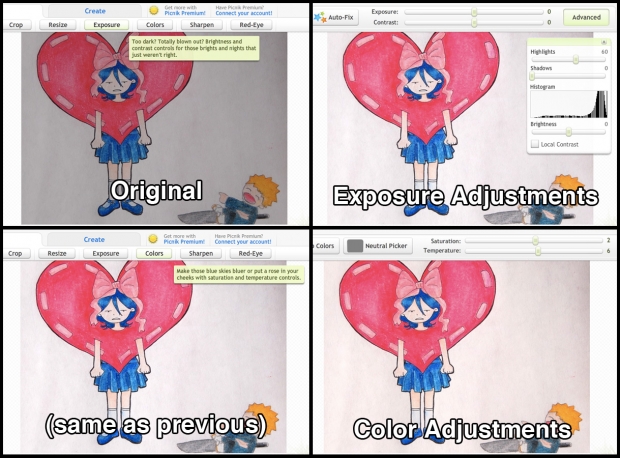
I found that the thing that looked best for this image was simply increasing the Highlights. (Try moving the "Highlights" slider back and forth and watch how it changes the histogram. It's the same as the righthand Levels slider in iPhoto.)
For your images, you may want to try adjusting the other options, as well. If you don't know where to start, try clicking the "Auto-Fix" button. Picnik will automatically adjust your sliders to something it "thinks" makes the image look good. From there, you can begin tweaking.
I also wanted to adjust the colors in this image. After finishing with the exposure, I went to the "Colors" section. There, I did two things: First, I increased the saturation slightly (no special reason—it just looked a little better).
I also increased the "Temperature" of the image. This made the colors sightly warmer, getting rid of the faint bluish tint that was originally a result of taking the picture with natural light on a cloudy day. (If you are editing a picture taken under incandescent light, you may want to lower the temperature to help eliminate the yellowish cast of the photo.)
Again: editing colored artwork is all about trial-and-error and experimentation. Don't be afraid to try new things—if it looks bad, you can always change your settings back.
Page One: Introduction.
Page Two: Prepare your artwork.
Page Three: Take the picture!
Page Four: Edit your lineart with iPhoto
Page Five: Edit your lineart with Picnik
Page Six: Edit your colored work with iPhoto
Page Seven: Edit your colored work with Picnik (You are here!)
Page Eight: Before and after!