STEP THREE: EDIT YOUR PHOTO
Part One: Editing lineart in iPhoto.
If you have iPhoto, it probably opens by default when you plug in a camera. Import your photos, and choose the best one. To get to "edit" mode, double click the picture you want to work on.
TIP! If you would like to practice by copying this step-by-step exactly, you can download my example picture here. Once you've downloaded it, use the iPhoto file menu to import the image.
While this image (taken with flash) is bright and clean compared to the non-flash version, it could still use some brightening up! Our goal is to turn this from a "dark grey and light grey" image to a proper black and white image. To do this, we will adjust the Levels and the Exposure.
Start by opening the "Adjust" box.
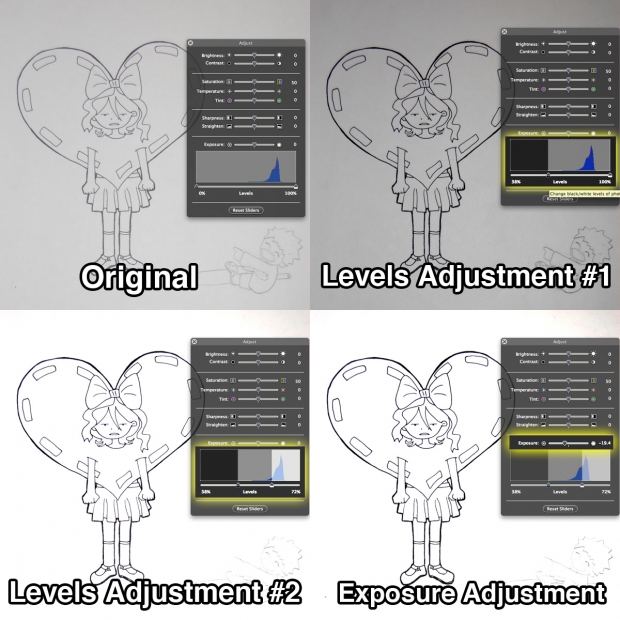
The easiest way to change an image from greyscale (low contrast) to black and white (high contrast!) is by adjusting Levels. The Levels image (called a histogram) is a visual measure of the brightness and contrast in your image. (For a more detailed explanation of the iPhoto Levels adjuster, click here.)
There are two sliders. One will make your dark colors blacker, and the other will make your light colors whiter. We'll use both of them.
Start by moving the left-hand slider toward the middle. This will make the image darker. Keep going until your lines look black. (If you continue moving it to the right, eventually your whole image be eaten by darkness!)
Next, move the right-hand slider toward the middle. This will brighten your background, bringing it closer to white. Once your background is satisfactorily bright, you can stop.
Directly above the histogram is a slider for Exposure. Changing the exposure at this point will gently tweak your image—a higher exposure will brighten your image even further, making your lines thinner. A lower exposure will do the opposite.
Once you're satisfied, you can save the image. You're done!
Page One: Introduction.
Page Two: Prepare your artwork.
Page Three: Take the picture!
Page Four: Edit your lineart with iPhoto (You are here!)
Page Five: Edit your lineart with Picnik
Page Six: Edit your colored work with iPhoto
Page Seven: Edit your colored work with Picnik
Page Eight: Before and after!