STEP THREE: EDIT YOUR PHOTO
Part Two: Editing lineart in Picnik
Picnik is a free online photo-editing tool. It is available at Picnik.com and does not require downloads or registration. If you have a flickr stream, you can also access Picnik using the small "edit photo" icon above each of your photos. (Since I accessed Picnik through my flickr account, the interface will have some cosmetic differences if you access it through the main Picnik site. However, you will be able to do the same things.)
TIP! If you would like to practice by copying this step-by-step exactly, you can download my example picture here. Once you've downloaded it to your computer, you can then upload it to Picnik.
While this image (taken with flash) is bright and clean compared to the non-flash version, it could still use some brightening up! Our goal is to turn this from a "dark grey and light grey" image to a proper black and white image. To do this, we will adjust the Contrast and the Exposure.
Start by clicking the "Exposure" box on the main editing page.
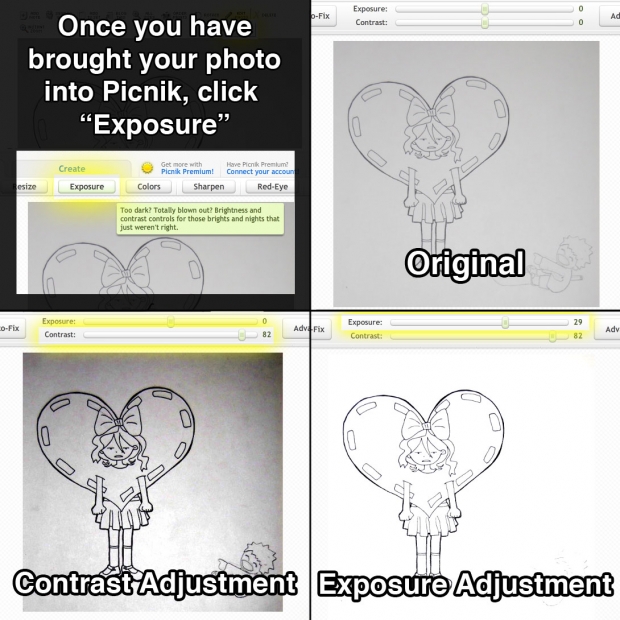
Ultimately, we want our image to be black and white. To start, let's make sure it contains black. Increase the contrast until your lines look solid and dark. Don't worry, we'll lighten the rest of the image next.
Next, we'll increase the exposure. The greater the exposure, the lighter your image will become. Move the slider until your background is white! (Remember that you can also readjust the contrast if you need to.)
When you're satisfied with your image, save it!
Page One: Introduction.
Page Two: Prepare your artwork.
Page Three: Take the picture!
Page Four: Edit your lineart with iPhoto
Page Five: Edit your lineart with Picnik (You are here!)
Page Six: Edit your colored work with iPhoto
Page Seven: Edit your colored work with Picnik
Page Eight: Before and after!