STEP TWO: TAKE THE PICTURE
This is the easiest and the most important step. Clicking the button is simple, but in order to get the best results you'll need to put some thought into when and where you click that button.
For all artwork:
1. Make sure your camera is able to focus on your drawing! Cameras have a minimum focusing distance—if you get too close to your subject, they won't be able to resolve the image, and you'll end up with a blurry photo. Get as close as you can while still taking a crisp picture.
TIP! If your camera has a "macro" mode (with an icon that looks like a flower), use it! It will help.
2. Make sure you are viewing your artwork from the correct angle! You put some effort into making sure your character looked good and had the right proportions. If you take the picture from the wrong angle, that effort will have been wasted and your drawing will look skewed. Try laying the paper on a flat surface and holding the camera directly above the paper.

Even though this is the same drawing photographed twice,
the version on the left looks lopsided and misshapen.
3. Use the three picture rule! This means always taking more than one photo. There are a lot of little things that can change a picture. Your hands might move, shaking the camera a little bit. Someone might walk by, blocking your light. The angle of your camera might be slightly off. Give yourself some room for error, and take a couple extra photos! Why three? Well, if you take two photos, one of them will be better. But if you take three photos, one of them will be best.
(Technically, you could take ten—or even a hundred!—pictures and choose the best one of all those. . . but sorting through nearly-identical photographs gets to be a chore pretty quickly. I've found that a limit of three works well.)
For Black and white lineart:
Turn on your flash! Using flash will do a couple things: First, it will lighten your image. Your paper will be brighter, and your linework will be lighter. (This is why it was important to ink your image earlier.) Second, it will help prevent motion blur from shaky hands.
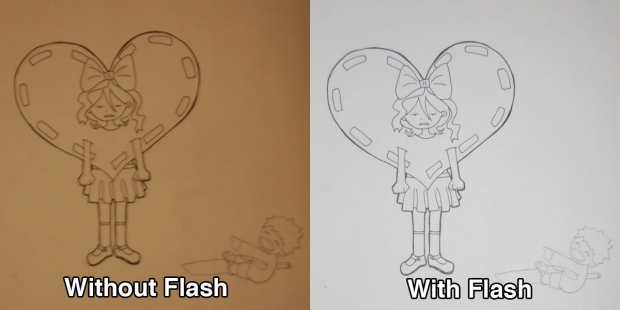
The lines are darker on the left-hand image, but the image is blurry and doesn't have a lot of contrast. It's better to have sharp lines, even if it means you'll need to darken them later.
For Colored pencil artwork:
Turn off your flash. Using flash has benefits, but for colored pencil, the cons outweigh the pros. Flash can reflect off of the pencil and leave you with white spots where you want color.
Find a well-lit area! Ideally, you want to take your picture in a room where there is lots of natural light. (This is so important that if you are taking your picture at night, you might want to consider waiting until the next day.) The brighter your room, the brighter and clearer your photograph will be.
This picture shows the same piece of art photographed using four different types of light. As you can see, the kind of light you use will have a big impact on how your art looks.
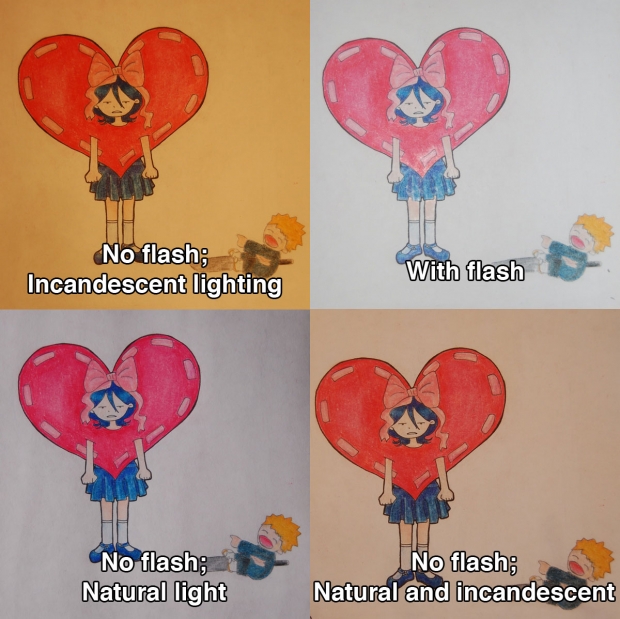
Note that "natural light" on a sunny day (not pictured) will look different than "natural light" on a cloudy/snowy day (pictured).
And here's a close up of the same four pictures (in the same positions).
Incandescent light (regular, old-fashioned lightbulbs) will give your artwork a yellow cast. This can cause loss of details or texture, especially in heavily saturated areas of warm color (like the red/pink of the heart). This is also the darkest image.
Flash gives colors that are closest to the actual drawing, but can reflect off of your paper, leaving white spots. This is especially noticeable at the tip of the heart and on her skirt.
Natural light (on a cloudy day) gives the image a slight bluish cast, but retains more details than the incandescent or flash versions. (On a sunnier day, there would be less of a blue tint.) This is the one I will be using as an example in the editing section.
The last picture was taken in a room with lots of both incandescent and natural light and has characteristics of both.
TIP! Many camera menus have an option to change the white balance of a photo. If you know where this option is located, play around with it! It can help reduce the color cast caused by different kinds of lighting.
Once you've taken your pictures, upload them to your computer and choose the best one. Next step: Editing!
Page One: Introduction.
Page Two: Prepare your artwork.
Page Three: Take the picture! (You are here!)
Page Four: Edit your lineart with iPhoto
Page Five: Edit your lineart with Picnik
Page Six: Edit your colored work with iPhoto
Page Seven: Edit your colored work with Picnik
Page Eight: Before and after!