Part 9: Front Shock Replacement
So yesterday (3/11/2014) I did some work on my truck after I got off from my day job. I was able to start a little before 4:00 which was okay because it was still 65 degrees-ish out and didn't get dark until after 7.
Had a slight complication with putting the shocks on so it took a little big longer. I had to figure out how to connect the top bolt on a shock that was a little longer then the old one.
Anyway I wish show a few pictures and explain what I had to do.
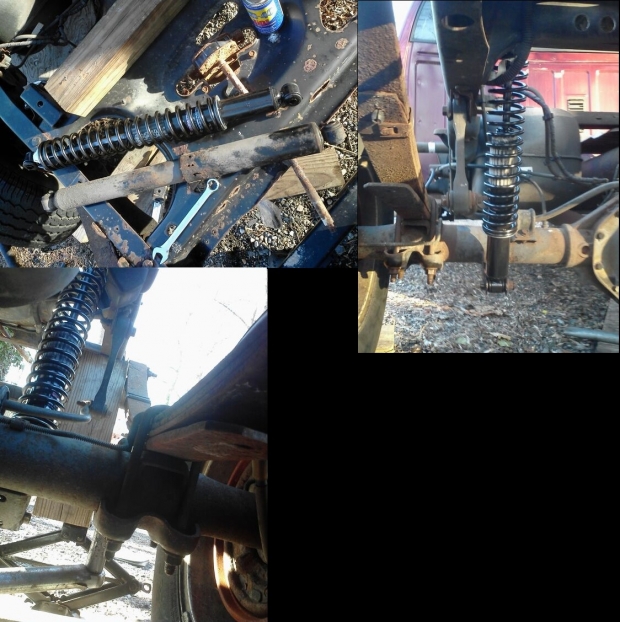
The top left image just shows the old and new rear shocks next to each other. The rear shocks stilled work for the most part, but would have failed at state inspection.
The removal of the old shocks was relatively easy and straight forward. Used a long 2x4 to bang the wrench down to initially break the bolt loose. From there I Just had to muscle it the rest of the way. So removal for the first shock was done and complete. Now to install the new one.
I first bolted the bottom of the new shock in place but did not fully tighten it. After that the complication happened. The top shock mounting hole was sitting about 2 inches above the frame mount. So came the decision; remove tow hitch bar to remove rear leaf spring mount or drop the axle.
Initially went with removing the tow hitch bar since there were less bolts but soon changed to dropping the axle. The tow bar bolts did not even move unless it was hit with the 2x4.
So if you look at the second picture down on the left side (I am currently tightening them) at the bottom where you see the wrench in the pipe I had to loosen the 2 U-bolts. That there was my workout for the day. I initially did not have a pipe for more torque. So when I tried to push on the wrench to loosen them I would instead slight out from under the truck on the gravel ground.
With the help of the pipe and the bolts loosened, I then took the truck jack and a 1.5 - 2 foot 4x4 and jacked up the rear of the frame. This was to take pressure off of the leaf springs to help decrease the spacing. Also this would allow the rear axle to drop away from the leaf springs to give the rest of the spacing to bolt the shock into place.
So after doing all that and getting a nice arm and shoulder work from undoing those bolts and then retightening then to secure the axle after the shock was in. The picture to the right side shows how the shock looks in place all complete. So with that it was off to repeat the process and replace the passenger side shock. Was pretty much the same process just had to work my way around the exhaust system.
One more step closer and today (3/12/2014) I shall attempt do replace the front shocks. These shall be a bit tougher since there is a V8 engine in the way. Might have to remove the tires but we shall see.
Thank you for reading and feel free to leave a comment. Have a good day/night everyone.