Hey! This is MangaKid again!
This is Part 2 of my Copic colour tutorial.
Thanks to Pramod aka ekaknr who asked me to do my own Copic colour tutorials. These posts will be in his Artist Cafe as well.
If you want to learn more about Copics, click HERE!
And click here for Part 1!
This is based on 'Our Dream' drawing I did for Panou's 'Its Ok to Cry' challenge. The model is Azuki Miho, referenced from the cover of Book 4.
The steps are explained going from left to right starting from the top.
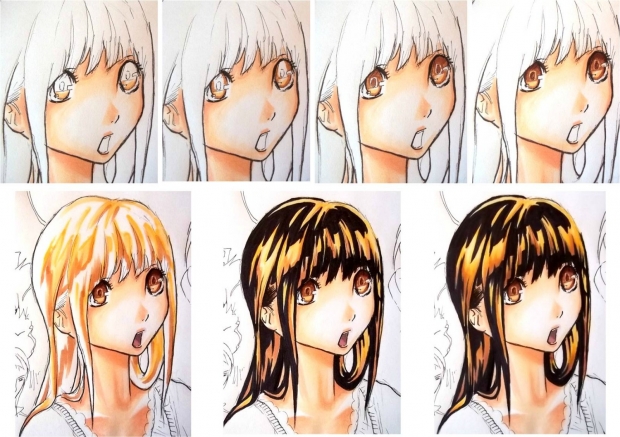
Here's some tips on colouring eyes and hair!
Starting with the eyes, I do the same technique that I usually do... Light colours before dark.
Here I used YR31(light reddish yellow), E33(sand), E35(chamois), E37(light walnut), and E29(burnt umber). (listed light to dark)
And for the hair, same concept applies. Light highlights on first and then add darker colours. Used YR31, Y35(maize), E33, and 100 (black)
I usually don't do hair in this style. Most of the time do streaks in light colours, starting at the top of the head and also the tips of the hair. Then I just keep bringing in more darker, matching colours. Its important to have similar colours with Copics. They'll blend more easily. Check out this FAQ to find info on the Colour system and which colours match up.
With copics, if you put down black ink from the #100 marker first and then try colouring around with light colours, the black will definitely smudge no matter how long you've let it dry. (THIS DOES NOT APPLY TO COPIC MULTI-LINERS!)
Ah I don't know what else to say =_= Let me know if you have any questions! :D
-MangaKid