(Since I got a few requests for this tutorial over at Minitokyo.net, I decided to write it and post it here as well. Enjoy ^^)
Ever seen those awesomely extracted images, with no artifacts (extra pixels) and wanted to try it yourself? Well, that's just what we're going to do in this tutorial! There are a few methods to do it, but the Pen Tool one works best for me and it isn't difficult either. Let's begin then, shall we?
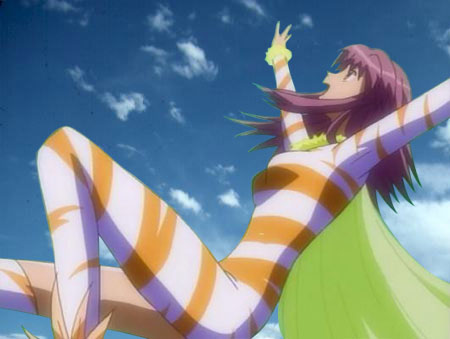
First, we need an image. If you're a beginner, I recommend picking one without a lot of elements and "gaps" (like girls with long, flowing hair; between the hair and the body there will be many small spaces that require patience). Let's pick this image for starters. Open it up in Photoshop.
Since it's a bit small, let's magnify it at 300% to see better what we're doing. Right-click on your Background layer and select Layer From Background... -> OK.
Take your Pen Tool (press P or select it from the main tools menu) and make sure you have these options selected:

I will start from the left of the image, by clicking on the outline of the girl's leg (I have the Pen Tool selected). A small square will appear after clicking -that's an anchor point. Basically, an anchor point is defined by two directions, represented by arrows. You don't see the arrows yet, but we'll work with them later on. Keep making these points along the outline of the character; it doesn't matter if the lines (which make a path) are off, we'll fix the later.
Tip: use as few anchor points as possible. I could have made a bigger path, but I shortened it for the sake of time. Here is what I have now:

Now, let's edit those lines! Remember me saying that anchor points have 2 arrows? Time to see them! Right-click on the Pen Tool icon in the main tools menu and select the last tool (the Convert Point Tool). Click on one of your anchor points and drag in a direction. You'll notice two arrows appear; the lines are now curved too

To align the lines along the outline of the character, select one of the arrows and drag it around until it is close to the outline, like in the image below (I used another anchor point). Do this with all the anchor points.

Now, right-click on you path and go to Make Selection..., Feather Radius: 0 pixels and check the "Anti-aliased" box. You've got the moving ants now, press the Delete key and voila! You've got a transparent part! Create more paths and repeat the procedure until you've completely removed the background and the character is the only one left.
- part of the background deleted
- entire background deleted
- final result (.PNG version)
To see how the image looks, I placed it on top of a stock image. And we're done! ^_^
Final tip: save your file as a .PNG; .GIF is another format which allows transparency, but the colors are not that well preserved. .PNG allows maximum exposure of the colors and is the best option.
Tutorial written by Olivia a.k.a. sweetdevil. No part may be reproduced or redistributed. Please link to it instead. Kaleido Star image © Gonzo, cloud image © respective owner.