Hey MangaKid here! This is my process report on '[My] Mona Lisa' artwork. I'm glad I stopped to take pictures every once in a while cuz this artwork was done a lot differently then how I usually do.
Original idea obviously by Leonardo da Vinci xD
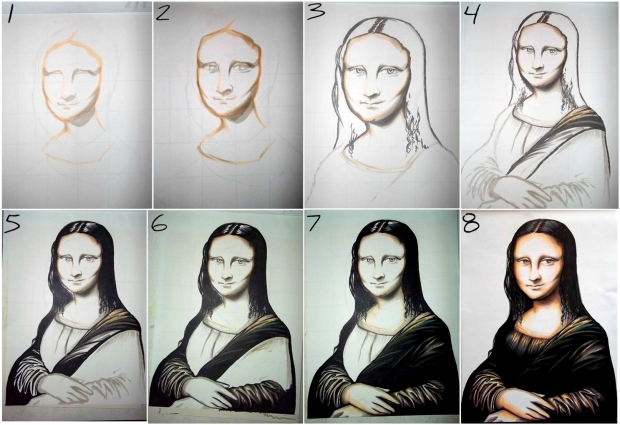
Step by step of my process:
Even before step one, I tried to sketch the Mona Lisa based off a reference picture on my 3DS wifi. It wasn't gonna work, it was so hard! I also had started with a different idea, to have the Mona Lisa painting herself. But I turned that down after I found that I was actually doing pretty well on it... I didn't wanna mess up! XD
1. I almost never start with just Copic marker. Usually I got with a pencil sketch to get my idea out, and then I transfer my idea/rough sketch onto my good copy paper with black multi-liners. Sometimes I even skip the pencil sketch stage. Anyhow, this time I lost patience xD which turned out to be a good thing^^
You might see some really faint pencil guidelines on the paper, but ignore those. They didn't help me at all. (If you did want to use guidelines to reproduce a picture, you need to print out the original picture and draw the same guidelines over top of your art paper and printed picture. It helps to line up where everything is supposed to go. I never work like that, but I think it can be helpful!)
So with W-3 (light warm grey) and E51 (milky white), I started to work on Mona Lisa's face and features by working off the reference picture.
2. I think I went over the lines again here and just added more features.
3. Here, I added her hair while using W-5 (darker warm grey). I went along the outline and started shading the face. If you can see, Mona Lisa's chin on her right side is bulging a bit. If it were anywhere else, it could have caused a bit of a problem but...
4. ... since the bulge was in front of her hair, I just had to shade over it with W-5. You can probably see that dark spot. In this stage, I also continued to draw her whole body with W-3. Using a very light colour, such as the warm grey, allowed me to fix mistakes and feel more confident that I wasn't going to mess up xD Also, I began bringing in some black, W-7, and yellows to the cloth over her shoulder.
5. I coloured her hair black and began going over my soft guidelines with black and darker greys. I didn't use cool greys in this, only warm greys. You can see that I separated Mona Lisa into quite a few sections. Its pretty vital to do that with Copics. If you get distracted or are working on too many parts, the copics will start drying and streaking if you go over them again.
6. Finished up the folds on her clothing and fixed up her hair a bit. This work used a lot of black ink. I actually had to refill my black marker during work.
7. I joined the arm and shoulder, adding some folds with lighter colours of warm grey and yellow. I also added green into the wrapped cloth. Started adding some milky white to her hands.
8. This is the finished work. I had one more stage between this, but that was some touch-ups and detail on the eyes/face. Actually a lot of the face isn't coloured at all... The white of the paper makes good highlights. I used W-3, W-5, and E51 to do the shadowing on the face. And I also added a prune-ish pink colour but I can't remember what its called right now. After colouring the last part of her clothing, I was pretty much finished. I wanted to do a background, but I probably would have ruined it xD
Click HERE to see full-size ^_^
Phew! If you read all that, all the power to you! Thankyou!
I hope you find this interesting or educational xD Leave any questions in the comments if you want!